Oct. 14, 2019
Tent living has long been the best way to experience the natural outdoors, so if you plan to spend weeks or even months living in a tent, consider building a platform for tent.
The benefits of using a tent platform are numerous. First and foremost, it elevates your tent off the ground, providing a level sleeping surface regardless of the underlying terrain. This not only improves comfort but also protects your tent floor from punctures and tears caused by rocks or roots. Additionally, the raised platform improves ventilation, allowing air to circulate underneath your tent and preventing moisture build-up. This is crucial for preventing mold and mildew growth, especially in damp environments. Finally, a tent platform acts as a barrier against crawling insects and small animals, offering peace of mind and a more secure sleeping environment.

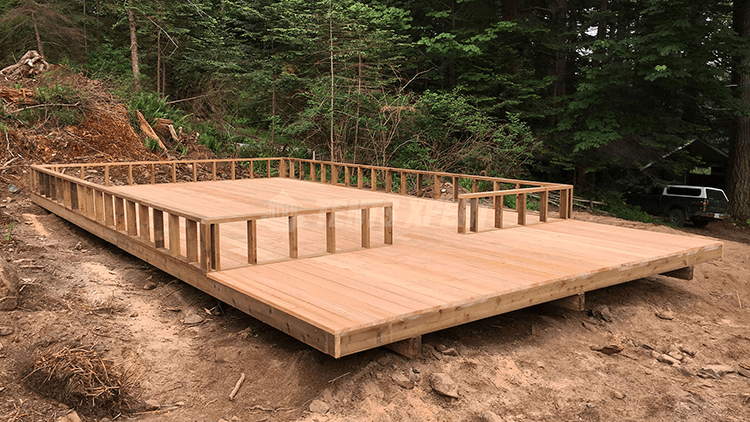
A tent platform is a raised floor designed to pitch your tent on and provides people with a clean, even place to live. The platforms are typically made of wood, but can also be made from other materials like metal or even stone. They come in various sizes, typically designed to accommodate a single tent, although some larger platforms can fit multiple tents for group camping. Tent platforms can be permanent or portable.
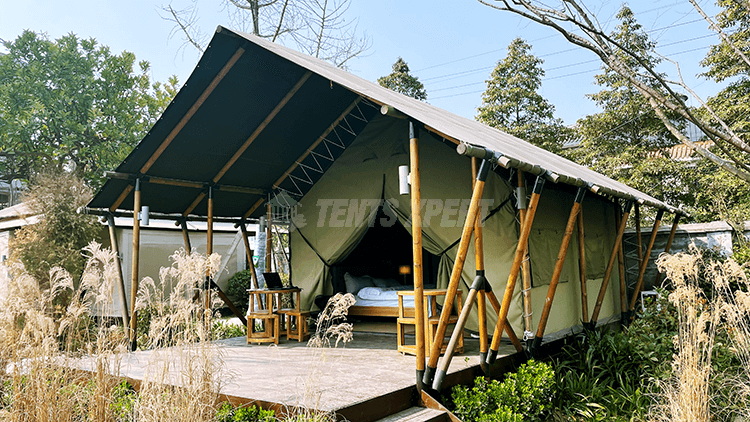
Permanent tent platforms are often found in glamping resorts. Those glamping tents are all set up on platforms. One platform tent like this is often called a deck tent or off-ground tent.
Portable tent platforms are a great option for campers who are looking for a more comfortable camping experience. They are relatively easy to build and can be transported from place to place.
In essence, a tent platform offers a multitude of advantages for those seeking a more comfortable, secure, and enjoyable extended camping experience. The investment in a portable platform can significantly enhance your outdoor adventures. Here's why:
Comfort and Convenience: Uneven ground can wreak havoc on a good night's sleep. A tent platform elevates your tent, creating a level surface regardless of the underlying terrain. This translates to a more comfortable sleeping experience, free from bumps and dips. Additionally, the platform keeps your tent floor off the ground, preventing moisture from seeping in and creating a damp, chilly environment.
Protection for Your Gear: Tent floors are susceptible to punctures and tears, especially on rocky or root-infested ground. A platform acts as a protective barrier, shielding the underside of your tent from these hazards. This not only extends the lifespan of your valuable camping gear but also ensures a dry and comfortable living space throughout your trip.
Improved Ventilation and Climate Control: Moisture build-up inside your tent can lead to the growth of mold and mildew, creating an unpleasant and potentially unhealthy environment. A tent platform promotes air circulation by allowing air to flow freely underneath the tent floor. This helps to regulate temperature, prevent condensation, and keep your tent feeling fresh and dry, especially during humid or rainy weather.
Enhanced Security: Many crawling insects and small animals can find their way into a tent pitched directly on the ground. A platform creates a physical barrier, deterring unwanted guests from entering your sleeping space. This provides peace of mind and allows you to relax comfortably knowing you have an extra layer of protection from creepy crawlies.

Platforms can come in many shapes and sizes, and no one is the best. Your design decisions will be based on the functionality and form you need. Decide how big you want your platform to be. You should be able to walk around the tent with extra deck space in front of the door. Your tent platform can be almost any size.
Find a flat surface and mark the platform area. Choose a level point with good drainage and a good view. If your site is not level, you may also need to add foundations to the platform and maybe even add stairs to get to the front door.
Take the 12x16ft platform as an example, it can accommodate a 10x12ft camping tent, with an additional 12x4ft front porch. Lumber and hardware will cost $450 to $500.
Items you will need:
Six 4- by 8-ft. sheets of ACX ½-in. plywood
Ten 12-ft. 2x4s (for joists)
Four 8-ft. 2x4s (for sides)
Four 8-ft. 2x4s (for legs)
Twelve 6-in. Stanley Lifespan strap hinges (No. 78-1515)
Nine Stanley 3-in. utility hinges (No. 75-2060)
Four Stanley 3-in. butt hinges with removable pins (No. 08-3031)
Ten 3/8×8-in. Stanley eye bolts (No. 13-0290)
Ten 5/16x2x5-in. Stanley square U-bolts (No. 13-4250)
Ten 3/8×7/16-in. tee-nuts
Twenty 5/16-in. wing nuts
Twenty ¼-20x20mm insert nuts
Twenty 1-in. washers
Twenty ¼-20×1-in. flathead machine screws
Seven Steps:
1. Hinge the Frame. Join two 8-foot 2x4s to form the platform’s 16-foot-long sides. Fasten together the 2x4s, end to end, using a heavy-duty 6-inch strap hinge. Next, saw ten 12-foot 2x4s into twenty pieces, each 70½ inches long. Join pairs of the 2x4s with strap hinges to create 10 floor joists, each 11 feet 9 inches long.
2. Build the Legs. Cut ten 2x4s to 10 inches, and another ten to 13½ inches. Screw the shorter 2x4s to the longer ones to create the legs. Use a C-clamp to hold the leg to the platform’s frame, then bore a 7/16-inch-diameter hole through both. Remove the clamp and hammer a tee nut into the hole on the back of the leg.
3. Set the Floorboards. The surface of the tent platform is made up of six 4- by 8-foot sheets of ACX ½-inch fir plywood. Join the sheets with 3-inch narrow utility hinges to create three folding panels. For a stronger connection, bolt the hinges in place with short machine screws, washers, and hex nuts. Apply marine varnish to the plywood.
4. Lay Out the Frame. Begin setting up the tent platform by first laying out its perimeter frame to form a 12- by 16-foot rectangle. Bring together each corner of the 2×4 frame, making sure the two hinge leaves fully interlock. Then, push the hinge pin down into place, locking together the two leaves and securing the frame’s corner. Repeat for the other three corners.
5. Attach the Legs. The tent platform is held off the ground by 10 legs, each 13½ inches tall. Attach each leg with an eye bolt. Thread the bolts through the frame and into the tee-nuts on the backs of the legs. Hand-tighten each bolt. Use the eye-bolts to tie the tent down.
6. Install the U-Bolts. Each of the ten 11-foot 9-inch-long floor joists is supported at midspan by a single 2×4 leg. Attach the legs with square U-bolts and wing nuts. Tap each U-bolt through the holes with a hammer, then hand-tighten the wing nuts.
7. Secure the Floor. Bore an 11/32-inch hole 1 inch deep into the top of the 2×4 frame at each screw location. Use a 6mm Allen wrench to thread the insert nuts into the holes. Then bore ¼-inch screw-shank clearance holes into the plywood. Tighten the 20 screws.
Then a wooden tent platform is well done.
While wood reigns supreme in the world of tent platforms due to its ease of assembly and lightweight nature, there are other options to consider depending on your needs and preferences. Here's a breakdown of the most common materials:
Wood: The classic choice, wood offers affordability and relative ease of construction. However, wood requires proper treatment to withstand the elements. Opt for pressure-treated lumber specifically designed for outdoor use. Cedar and mahogany are naturally weather-resistant options, offering superior durability but at a higher cost. Remember, proper maintenance is key – regularly inspect your wooden platform for signs of wear and tear and reapply sealant as needed.
Concrete: For a permanent and ultra-stable platform solution, concrete offers unparalleled strength and longevity. This approach is ideal for glamping setups or frequently used campsites. However, constructing a concrete platform is a labor-intensive process requiring excavation, formwork, and pouring concrete. The weight and immobility of a concrete platform make it unsuitable for backpackers or those who frequently change campsites.
Metal: Metal platforms provide a sturdy and weatherproof alternative to wood. Aluminum is a popular choice due to its lightweight properties and resistance to rust. However, metal platforms can be more expensive than wood and may require specialized tools for assembly. Additionally, metal conducts heat and cold more readily than wood, which might be a factor in extreme weather conditions.
While the platform material is crucial, other factors enhance your platform's functionality and longevity:
Fasteners: Choose high-quality, galvanized or stainless steel fasteners to prevent rust and ensure a strong connection between components.
Drainage: Incorporate a slight slope or drainage holes in your platform design to prevent water from pooling and causing rot or mildew.
Flooring: Consider adding a layer of plywood or composite decking on top of the platform base for additional insulation and a more comfortable walking surface.
For those seeking a quick and readily available solution, ditch the construction project altogether. Look for naturally flat, elevated areas with a base of compacted earth or packed gravel. Alternatively, use a layer of large, flat rocks like rotted granite to create a raised, stable surface for your tent. This option might not offer the same level of comfort and protection as a platform, but it provides a basic barrier against uneven terrain and moisture.
The choice of material for your tent platform depends on your priorities and camping style. Wood offers a balance of affordability and ease of use, while metal provides unmatched strength. Concrete is ideal for permanent glamping setups, and natural rock formations can be a quick, albeit basic, alternative. By considering these factors and incorporating smart design elements, you can build a platform that elevates your camping experience for years to come.
References: Outdoor Life
Previous: What Are Glamping Business Models?
Next: None

Chat Now